


")


")


Description : Drive your heaters with indoor and optional outdoor temperature sensors.
With users from touteladomotique forum, we speak about lack of plugin to manage our heaters. With Fatal25 we started development to complete a first version published in early December 2012.
1/ How it works
Goal of thermostat is to regulate the temperature in a room (or area). It exists real thermostats (some in Zwave) , equipped with a temperature sensor and a control link to your heater. You tell it a setpoint and it drives the heaters to stay around.
Here, this the same principle except thermostat is virtual and can drive from Vera (or your iPhone).
1.1/ What do you need?
A heater controlled by the Vera and a temperature sensor (which is also connected to Vera). I suggest you to use Oregon probes and RFXCOM USB module (eg here). So you can enjoy the decimal places for temperature control.
1.2 / basis functions
Once set up correctly (we will how to setup later in the article). You will be able to control one or more radiators
Different modes:
Thermostat can be in three modes:
- Off : Shutdown all heaters
- Auto : let plugin decided (based on the temperature) whether on or off heaters. This is the most common mode.
- Bypass : plugin is disabled. Useful to be able to operate your heater without this module.
- Heat : forced mode. put your heaters On (during forced mode duration).
In Auto mode, plugin automatically decide, based on the temperature of the room and outdoor temperature (optional) heating duration necessary to achieve or maintain wishes temperature. To do that, once per hour (or when setpoint changes, etc.). Plugin calculates a percentage of heating. As an example (values are fictive) the temperature is 21° and the room temperature to 20.3°, plugin estimate a heat time of 25%. It turns On heaters during the first 15 minutes, then Off for next 45 minutes. After a hour, it restarts the calculation to estimate the need for next hour etc..
This lets time to equilibrate room temperature’s before recalculating a heating duration. In this way it is independent of distance between temperature sensor and heater. Thus we limit number of changes of state of heater control modules.
Temperature setpoints:
There are two setpoints: one for the comfort mode (red) and one for the Eco mode (blue). Depending on what mode is set, plugin uses it to calculate the heating duration (if of course you are in Auto mode). In case of change of setpoint or setpoint mode, heating time calcul is restarted without waiting for end of hour.
It is possible to choose a decimal value to the instructions given through the full:

To do this, you must use the “Set” button for example with the value “20.5” (note the decimal point is the point).
1.3 / Advanced functions
Auto learning :
Each room (or area) has their own characteristics: thermal inertia – heating power – outside Insulation. Heating time required to reach the set temperature is specific to each of them. Plugin is continuously learning to calculate right heating time and thus do not consume more than necessary. At each end of the heating phase, plugin examines and adjusts coefficients. To avoid disturbances due to external heat sources, coefficient calculation is a weighted average of the last 50 learning. Therefore let several days (2-3) for the best fits plugin.
For example, at home with default coefficient (60 inside and 1 outside), the average temperature of room was rather between 21.2° and 21.5°. After 3 days with auto learning,new constants are 49.7 for indoor and 2 outdoor.
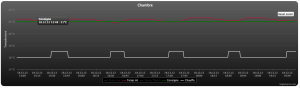
we can see each hour’s (yellow square), room temperature is 21 (= setpoint).temperature rises during the hour until 21.2° then reach 21°. But my probe is rather close to heater, so when temperature is averaged in the room, the perceived temperature is well 21°.
Shutdown when opening windows :
It possible to add door sensors (or virtual switchs) to shutdown heaters.
Il est également possible de choisir un délai avant la coupure et un délai avant la reprise. Ainsi si vous ouvrez et refermez la fenêtre durant un bref instant (inférieur à la durée du délai que vous aurez paramétré), le plugin ne coupera pas le chauffage. (idem pour la reprise, si vous fermez et rouvrez brièvement votre fenêtre alors que le module a été coupé suite à l’ouverture prolongée de la fenêtre)
It is also possible to choose a delay before shutdown / resumption. So if you open and close the window for a short time (less than delay you set), the plugin will not cut heating.
Tempo forced mode:
It is possible to choose to associate a time limit for forced mode. If a deadline is set, when you turn (manually or via a scene) the forced mode button (heat), a countdown begins. At the end of module automatically reverts to Auto mode.
Safety on temperature sensors:
Security checks that temperature from your probes date less than 2 hours for inside temperature and 24 hours for outside temperature. Otherwise, the probe is skipped. If all probes are ignored, the plugin will consider that the room temperature is equal to set temperature and turn off heaters.
So no problem if one of your sensors has no battery, there is no risk that the heaters remains active for hours
2 / Installation and Configuration plugin
2.1 / Installing the plugin
Just go in APPS and install applications on the VERA, then download the module Smart Virtual Thermostat .
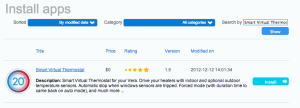
Once the installation is complete, a new module has appeared on your interface:
Press the “Reload” your interface to restart the vera:

After (a page refresh may be necessary), enter the advanced settings of the module.
2.2 / Setup plugin
Once the module is created, here is the list of available settings:
Mandatory parameters:
Inside Temp Sensors: Complete list of ID with your internal temperature sensors separated by commas. The plugin average all values.
heaters: Complete list with the ID of your radiators separated by commas
Optional parameters:
Outside Temp Sensors: Complete list of ID with your external temperature sensors separated by commas. The plugin average all values.
inhibit Sensors: Complete with a list of your door sensors separated by commas. If you want to reverse the condition (switching off the heating if the sensor is 0) must put a minus before the id of the module. If at least one of the sensors is activated => heating off.
Waiting Time Open: Duration of tempo seconds before switching off the heating if the sensor is activated
Waiting Time Close: Time in seconds before the timer resumption heating if all the sensors are disabled
Forced Mode Duration: Duration of forced mode before returning to automatic mode. XX: the second, XXm: in minutes (eg 30m) XXh: in hours (eg 1h).
PowerMin:% minimum heating if the module believes it is necessary to heat (according to the temperature inside and outside)
Calculation period: Time (in seconds) between two calculations of heating power (3600 by default)
ConstC: This is the coefficient of heat inside. It depends on the size of your room and the heating capacity of your heater (60 by default)
ConstT: This is the coefficient of external heating. It depends on the insulation part relative to the outside (1 by default)
AutoLearning: This is a variable specific to self calibration. There is no need to touch it. Variable is made up as follows: X, Y1, Y2, T1, T2, P. X is the state parameter: 0 = uninitialized, 1 = initialized, 2 = disabled. Y1 and Y2 corresponds to number of learning for the constant respectively inside and outside the constant. when Y reaches 50 first learning is complete, but self-calibration continue. T1 and T2 are temperatures inside and outside at time of last calculation power. % P is calculated in the final calculation of power.
3/ Evolution des versions
**** 1.5 **** released 12/13/2012
- Add auto learning.
**** 1.1 **** released 12/04/2012
- initial version
This post is also available in: French


